

Displacement in Octane for Cinema 4D
Part 3: Troubleshooting
Part 3: Troubleshooting
About this guide
This is part 3 of the Displacement in Octane for Cinema 4D series. It’s meant to point out the biggest issues you may encounter while using displacement and steer you in the right direction for fixing them.
For more detailed information about displacement, check out the other two guides in this series:
Part I: Introduction to Displacement and Part II: Model and Texture Considerations.
Part I: Introduction to Displacement and Part II: Model and Texture Considerations.
“It’s Not Working”
1. Is it plugged in?
We know, we know... humor us.
In C4D
Before you do anything else, pause the render, hit the [R] button in the Octane Live Viewer to do a full refresh of the scene, and then hit the Octane button to start it up again. This will clear out the cache from the GPU and send everything into VRAM again.
Is the right material on the right model?
Is there an active selection in the material tag that’s limiting it to only a few polygons (or none because the selection tag has been deleted, but the material still has something in it?).
Is there another material tag overriding the material with displacement?
In the Octane Material
Is everything in the node tree hooked up correctly?
Is the source image in the /tex directory, and Is the path to the texture correct in the ImageTexture node? Try reloading it.
Is the height value in the displacement node enough for the scale of your model to see anything? Make it 100cm and see if that changes anything.

If you’re using Texture displacement and doing anything procedural (generating, mixing, mapping, OSL, etc), does that procedural chain end with a Baking Texture node before going into the Displacement node?
If you’re using Vertex displacement, is the map type set correctly (Height for b&w, Vector for vector maps)?
2. Check the texture itself
Disconnect the displacement node and run the ImageTexture node into the albedo channel instead.
Create a new plane with 500x500 segments, and apply the material to it (don’t copy the tag from your model in case it’s a problem with the tag) to isolate the problem better.
If it looks like what you’d expect, it’s likely not a problem with the image itself, but it’s probably worth double checking the rest of the steps in this section. Try routing it back into the displacement node now and see if it works on the plane. If so, it’s an issue with the tag, material setting, or model, not the source texture.
If the image is coming up black in the thumbnail and not showing up in the color channel (even on the new plane), it’s probably a texture problem.
Open the texture in a 2D image editor - sometimes the image itself is corrupt, in which case you will have to get a new copy of it, attempt to repair it, or use a different texture.
If it opens fine, try saving a copy as a PNG. If that works, there’s likely an issue with layers or other data in the original file that breaks Octane.
If the texture is a PSD, open it up in Photoshop or another image editor that supports PSDs, and make sure there are no smart objects or vector layers. If so, save a copy as a flattened image (no layers), and try again with the new flattened version. While Octane does recognize PSDs with layers, if there’s anything fancy in there like effects, vector objects, or other procedural layers, Octane will often just show the texture as black in the thumbnail and it won’t work.
If the texture is an EXR, open it in an image editor and see whether it’s a multi-layered file. If so, extract just the height map and use that.
If saving as a flattened copy doesn’t work, it’s probably not a texture-related issue.
3. Check the model
Not much here will make displacement simply not work.
If you’re using Vertex displacement, just make sure you have enough geometry via subdivision or segments to actually displace polygons so you see anything. If you do, the problem probably lies elsewhere.
Make sure all your normals are aligned and facing outward.
Check to see if there are any polygon selections and whether they’re linked to the proper materials.
4. Check UVs/Projection
Are you using the right projection?
If you’re using UVW to XYZ projection, is it set up properly?
If you’re using MeshUV projection, Is the UV island you want to displace overlapping part of the texture with displacement?
5. Ask someone to take a look at it
If nothing above worked, try asking in the Octane forums on or on a Slack group and see if someone else is having the same issues - if not, it may be something system-wide like a corrupted install of Octane or messed up settings.
“It keeps crashing”
Check your System
Do you have enough VRAM? (The Live Viewer says how much it’s using). Usually if you run out, it'll overflow into Out-of-core memory, but sometimes it might crash. Consider simplifying the scene if this is an issue.
Is anything else in the background eating up GPU resources (did you leave a game running? Are you rendering something in After Effects at the same time?)
Do you have enough available RAM and hard drive space? RAM should ideally be 2-3x the amount of VRAM, and you should always have 30 or 40GB of free hard drive space at a bare minimum for any 3D work.
Check your Scene/Settings
Is the polygon count too high? Different systems can handle different amounts of triangles, but usually over a few million, things can start to slow down, and over ten or twenty million can sometimes cause crashes depending on the GPU.
Are you doing other really complicated things in the scene like caustics, sims, or other something else that eats up a lot of resources?
Copy just the model and the displacement material into a new scene and see if that works.
“Missing polygons/clipping”

This is almost always seen in texture displacement (not vertex). It’s very apparent when you move the camera around and different polygons disappear.
This issue is fixed by adding more actual polygons to the mesh (subdividing).
“Water stains”

This is another common texture displacement issue. The way around this is to play with the filter value, and also increase the polygon count of the base mesh and texture resolution to get corners as sharp as you need them. A higher resolution in the Level of Detail dropdown can also help this.
Pixelated along X & Z Axes

If the image looks steppy and pixelated along the edges of curves or diagonals (but not necessarily pixelated along the displaced height axis), it’s probably a resolution issue.
If you’re using texture displacement, both the source texture itself AND the level of detail set in the displacement node need to be high enough res to look smooth.
If you’re using vertex displacement, the source texture has to be high enough res, and the amount of polygons on the surface has to be dense enough to look smooth. As you can see above, even when using an 8k texture, it won’t look good until there are a lot more polygons in the displaced area.
This could also be an issue with the UV island where you have displacement being too small. The smaller the island, the fewer pixels it will have to work with and the lower resolution that area will be, even with a very high resolution texture. This is a balancing act with the rest of the model, but it may be worth sourcing a higher resolution texture just for the area you want displacement on and breaking out the geometry so it has its own UV map and everything can be larger.
Stepped along the Y (height) Axis

This is likely due to low bit depth of the source image and/or too high of a height value. It’s most common on 8-bit PNG or JPGs, but depending on how the map was made, it could even be a problem in a 16-bit height map if you’re trying to push it too far (increase the height too much).
You can’t upsample bit depth without some really serious specialty tools, and even then it may not get you the result you’re after. Depending on the map, you could try blurring or dithering in a 2D application, but odds are good you’ll have to either find/make a higher bit depth version, lower the height value, try to cover it up with bump/normal map, or obscure it with other objects in the scene.

If you are using Texture Displacement with a Baking Texture, make sure the Type field in the Baking texture is set to HDR linear space. This will convert procedurally generated textures into a flattened 32-bit image which will avoid stepping.
Variable Resolution Issue

If part of the model looks great, but another part right next to it looks pixelated, it’s probably an issue with the topology of the model, the UV map, or both.
This is far more of an issue in vertex displacement than texture displacement since vertex displacement is using the true polygon mesh of the model rather than creating its own voxel grid like texture displacement does.
The solution is to even out the transitions between large and small polygons on your mesh, and/or redo the UVs.
Intersecting/Misaligned Edges
This one is tough to diagnose because there are several independent things that can cause it.
Mid Level Issue

If the source texture is using a Linear color space, the mid level should be set to 0.5. At that point, anything that’s 50% gray will not be displaced, and edges should align properly (assuming the texture tiles properly).
If the texture is set up so that black is meant to be the midpoint where different UV islands are supposed to connect seamlessly, set the mid level to 0. If white is meant to be the midpoint, set the mid level to 1. If it’s any other value, you’ll have to manually adjust the value so it aligns properly.
Color Space Issue

If you’re using Vertex displacement and are using a texture with a Linear color space (16 or 32 bit), you’ll need to change the Color Space in the ImageTexture node to be non-color data and set the midpoint to 0.5.

When using vertex displacement, If you need to adjust the image to compensate for an sRGB or other gamma curve, you can do that in the Image Texture node by using the Color Space and Legacy Gamma controls.

Texture displacement already treats incoming data like non-color data, so changing the color space in the image texture node or adjusting the gamma in the baking texture node won’t affect anything.
If you’re having color space issues, you can try correcting them either by running your original source texture into a Baking Texture node and then adjusting the gamma/color space in the original texture node (not the baking texture node), or by placing a Color Correction node between your original texture and a new baking texture node, and then changing the gamma in the Color Correction node.
In both cases, make sure to set the Baking Texture Node to HDR Linear Space
If the source image is in any other color space (like sRGB), It’s going to be a balancing act of adjusting the legacy gamma/color space, and the mid level values. Maps can be created in a number of ways, it’s anyone’s guess as to how it was done. Gamma curves not only affect the mid gray, but all of the grays along the gradient, so the wrong one will create curves in straight lines. Sometimes you may just not be able to correct a weird map, and you’ll either just keep tweaking the midpoint to avoid intersections and not worry about the distortion, or find a new map.
UV Issue
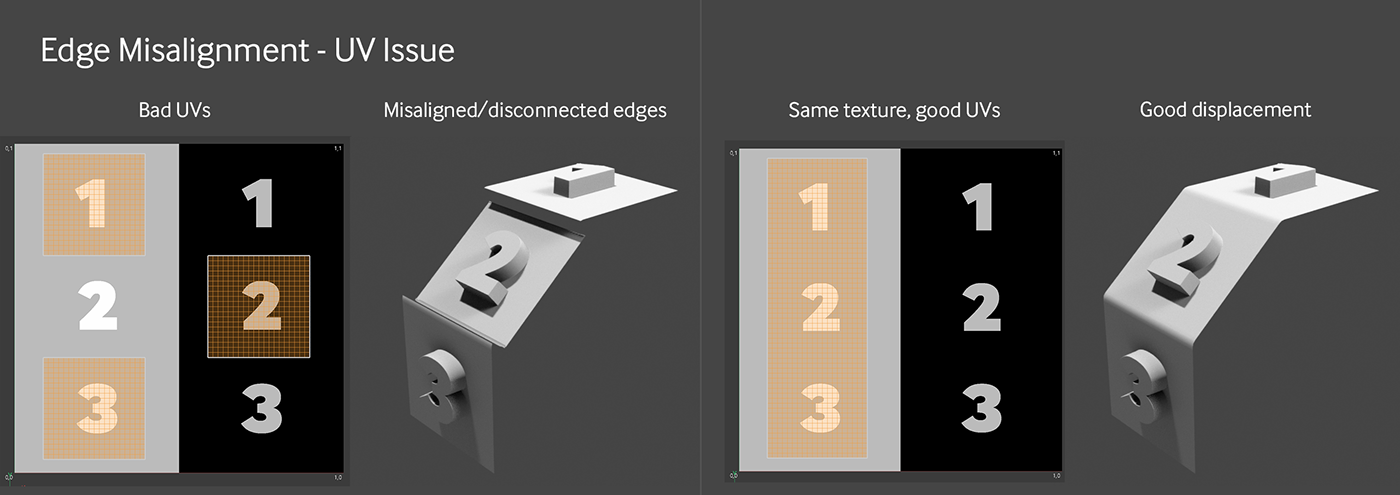
Another possibility is that the UV islands that make up the two edges which are adjacent to each other are overlapping parts of the source image with different tones. This will cause one to be “lower” than the other and cause misalignment (or disconnected panels). Make sure the edges around the UVs are correct. Fixing this may be a matter of redoing the UVs and/or editing the image.
Procedural Setups: Color Space Issue

If you are generating procedural displacement data (using color and pattern nodes to make your maps) in Octane itself, and want a 50% gray field to act as a “baseline” (no displacement), your first instinct may be to grab an RGB Spectrum node and make that 50% gray. This won’t work when you go to set the mid level at 0.5 because the RGB Spectrum node spits out values in the sRGB color space. Octane’s non-color channels like bump/displacement/roughness/etc are all expecting non-color data in a Linear space. In order to correct this, the mid level value would have to be somewhere around .22 or so, and that might throw off the other black and white values you combine with this node.
Instead of an RGB Spectrum node, use a Float Texture node. This will generate a linear non-color data value between 0 and 1. 0.5 will correspond to “middle gray”, and no displacement will occur in that portion of the final texture when the mid level is set to 0.5 also.
Distortion
Curve, Squash & Stretch

If you are expecting a straight linear ramp, or round hemisphere, but end up with a curved linear ramp or the top of an egg, it’s probably due to the color space. This usually isn’t an issue with texture displacement, but with vertex displacement you have to make sure the color space in the ImageTexture node matches that of the image file.
Depending on the map itself (namely ones that don’t use the entire black to white spectrum), having the wrong color space may also make the overall height seem “stretched”. This is due to where the middle gray falls on the gamma curve.
If your source texture is in a Linear color space, change the color space in the ImageTexture node to non-color data. If not, you may have to play with the legacy gamma number to correct for whatever color space it’s in.
Remember to use an Image Texture node - not a bitmap one (usually a problem when the node editor isn’t used). You have no control over the gamma curve with a bitmap node.
If you’re using vertex displacement, you can alter the values in the Image Texture node directly. If you’re using texture displacement and need to correct the image, you’ll have to run the Image Texture node through a Baking Texture node (set to HDR linear space) in order to see the results of the changes you make in the Image Texture node.
Crunchy Surfaces and Spiky Edges

This is probably due to JPEG lossy compression artifacts.
To counter this, you can try the filter with texture displacement, try applying a light blur to the image in your 2D image editor, or try finding the source in another format like PNG, TIFF, EXR, etc.
Wrap up
That should cover most of the common issues with displacement in Octane. Please leave any comments below if you’ve come across problems not covered here.


